Thursday, December 12, 2019

Individualized Learning with Google Forms

I wanted to give my students a formative assessment while providing remediation all at the same time?

Is that even possible?


It is!!

Do you know those Choose Your Own Adventure books?

My brother and I loved those books when we were kids!

Are those even still around?

I haven't seen one in forever.


These books allowed you to determine what happened next in the story based on your decisions of what characters should do at critical points in the story.

You can take this same basic concept to create individualized learning activities for your students using Google Forms.

I made my first one a few weeks ago and I'm here to tell you I will be making more.

I've seen some fancy ones out there and compared to those mine was very simple and not very impressive.

But it worked for my students so I'm calling it a success.

I'll get a little fancier with the next one.


So let me give you a little background as to the purpose of my activity and then I'll tell you how I created it.

My students were reviewing for their assessment on proportional relationships.  Our big ideas for the unit were using tables, graphs, and equations to determine if a relationship between two quantities was proportional or not.


I wanted to be able to do a formative assessment on those three big ideas all while giving students support if they needed it.

Using the branching feature in Google Forms I was able to do just that.

Want to learn how to make your own?

Keep reading and I'll show you.

Branching is how you create multiple paths within one Form.

For my review activity I used branches to allow students to skip from one big idea to another if they answered questions correctly.

If they missed a question they were taken to a video that retaught the big idea and then were given another chance to answer a question about the big idea.

I think they really enjoyed being able to work and learn at their own pace.


So let's get started creating your own.


First, create a new Google Form.

Screen Shot 2019-10-14 at 3.08.03 PM

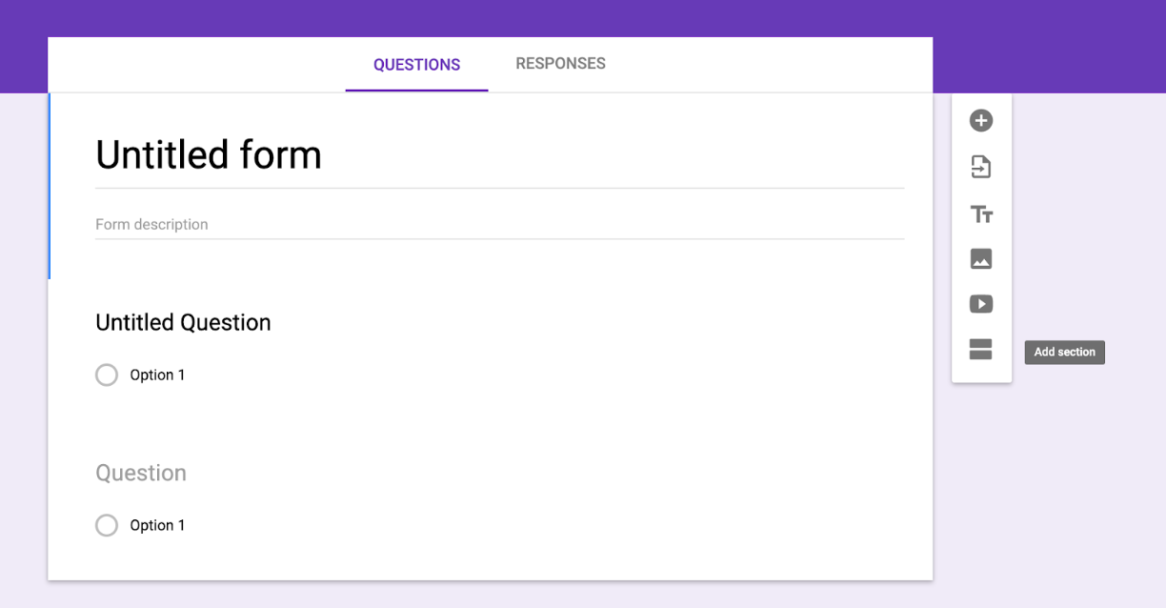
Next select the "Add section" option.  Once you have added a new section you will have two different ways of moving from section to section.

Screen Shot 2019-10-14 at 3.08.14 PM

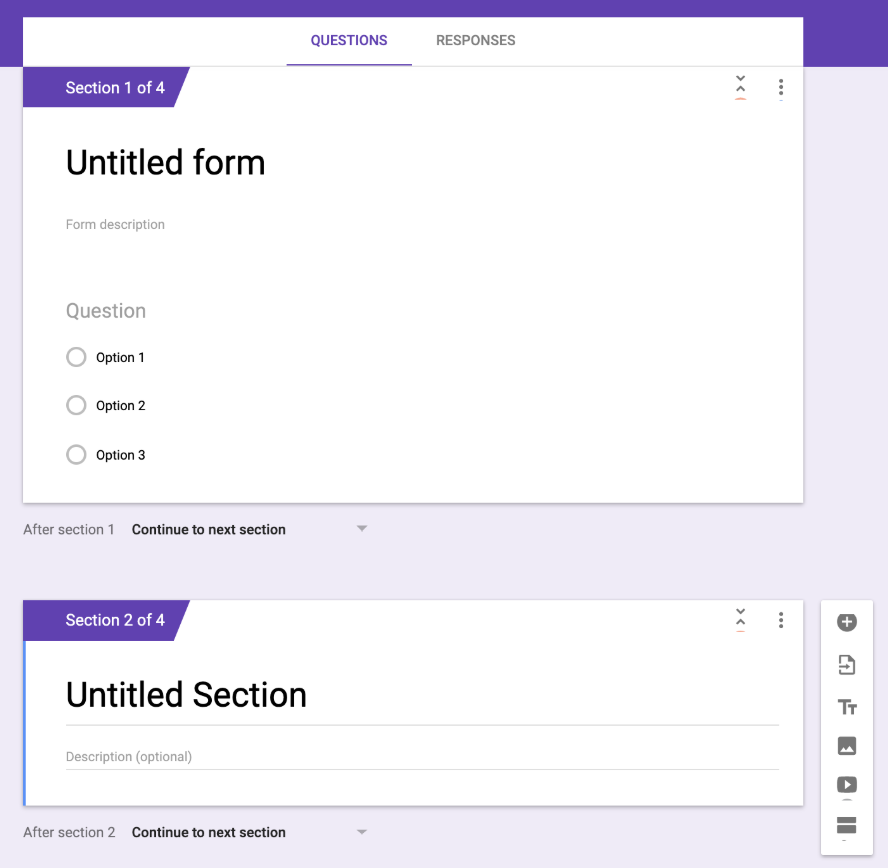
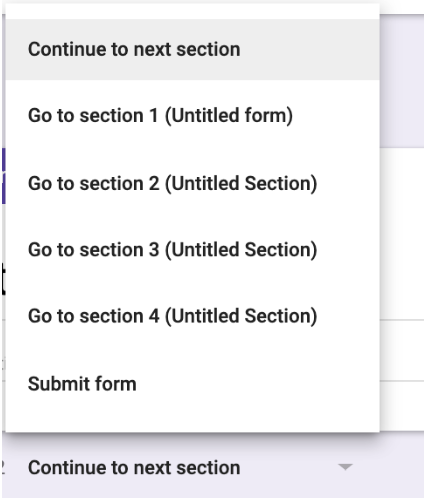
The first option is send your students from one section to another with the branching options as shown below.

Screen Shot 2019-10-14 at 3.08.24 PM

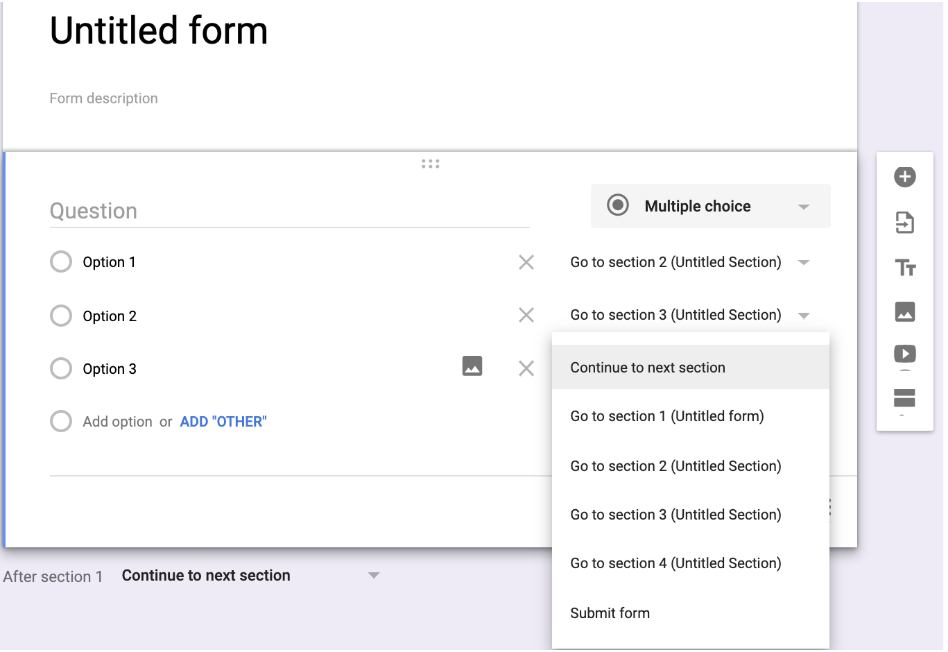
The second option and the one I used is to send students to a section based on their answer.  You can see how to choose this option in the picture below.

Screen Shot 2019-10-14 at 3.08.39 PM

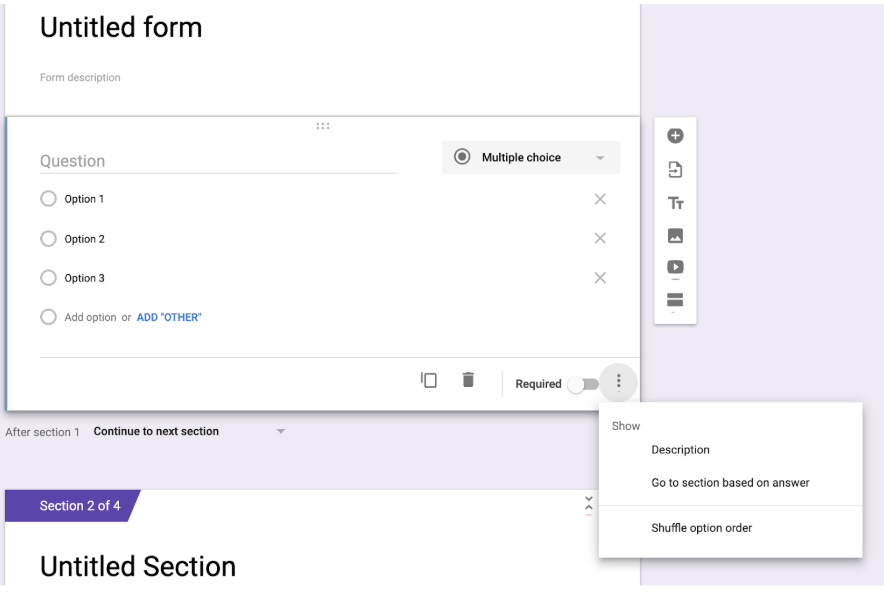
After you  have chosen this option a new menu will appear on each question allowing you to send students to different sections based on their answer.

Screen Shot 2019-10-14 at 3.08.51 PM

It's that easy.

Of course depending on how many sections you create it can become a little more intricate.

I found that for me it was helpful to write out my plan on paper before trying to create the  Form and all the different sections and branches.

For example...

Section 1: Is the table proportional?
Section 2: Video Help #1
Section 3: Attempt #2
Section 4: Video Help #2
Section 5: Attempt #3

Section 6: Is the graph proportional?


On this form I gave students three attempts for each big idea.  They were three different questions, but were all the same time of question.

I set the third attempt to have response validation.  This requires students input the correct answer before being allowed to move on.

If students got to that third attempt and couldn't figure out the right answer I was able to reteach them one on one or in a small group.

I hope this makes sense.

If you have any questions please send me an email or leave a comment with your question.


Let's chat again soon!

Saturday, August 24, 2019

Creating a Social Contract

A few summers ago I attended a training for a program called Capturing Kids' Hearts!

Let me tell you it was hands down the absolute best professional development I have ever had.

I am such a believer in what they are doing and promoting. 

It is all about building relationships and capturing kids' hearts as the name suggest.

There are many different pieces to it and I couldn't possibly share all of them.  

It really is something you need to attend their training to receive the full benefits.

But I do want to share one aspect with you today.

It's something I would venture to guess you are probably doing or have seen on Pinterest.

Let's talk Social Contracts.

This is very similar to Classroom Norms or Expectations.

I start by asking my students to think about and respond to four questions.

1.  How do you want to be treated by me (the teacher)?

2. How do you want to be treated by each other?

3. How do you think I (the teacher) want to be treated by you?

4. How do you want to treat each other when there is conflict?


After students have plenty of individual think time, I then put them in groups of four giving each student a role.

The Manager keeps the group on task.
The Recorder records a final answer/list for the group.
The Speaker will share the group's final answer with the class.
And my favorite role - The Encourager.  I love hearing my students cheer their classmates on for sharing their answers.

After group time, we begin sharing and discussing as an entire class.

During this time I have a student volunteer to be the Class Recorder.  

Their job is to record the answers as we discuss them.

If an answer comes up multiple times, the Class Record will put a check mark by that word every time it comes up.


Everything is student led.  I am simply facilitating the conversation.  I do manipulate the conversation in order to add No Put Downs on our social contract.

Once the class discussion is over, students are given the opportunity to sign the contract before you display it in the classroom.

I chose to create WordArt with the list this year.

Each class was done in a different color.

This is 2nd period's Social Contract.

We are in the process of having everyone sign it and then I will hang it at the front of the room.

I will remind students of what they agreed to, but more so I will teach students to remind each other.

Do you do anything like this in your classroom?

Monday, August 19, 2019

Five of My Favorite Integer Activities

Teaching integers is one of my favorite topics.

Why?

Because in the beginning students act as if they will NEVER understand Integers.

Working with negative numbers is sooo hard and confusing.

And then they get it!!

Plus there are so many real life examples and activities that can be done with Integers.

I love that in most pacing guides out there, at least the ones I've come in contact with, integers is taught at the beginning of the year.  It is such a great way to build that math confidence early on.

Don't get me wrong, integers can be confusing and some students really struggle with the concept.  I just think there are so many great visuals and activities out there to help those struggling students.

Okay.

Enough of my ranting.

I have FIVE integer activities I want to share with you.


This Ordering Integers cut and paste activity is great for making a simple concept more hands-on.  What is it about cutting and pasting that just makes it more fun?  And when you print it on your favorite astrobright paper...you might as well be throwing a party!

Students get six sets of numbers that they must put in order from least to greatest.

And if cutting and pasting isn't your thing then you might appreciate the digital version of this activity.


Learning to add integers on a number line can be a bit tricky.  This digital activity is great practice and helps catch some common mistakes.  It comes with 20 different problems but you can easily cut that down if you feel like that is more than your students need or can handle.


As you can probably tell, I'm all about making simple activities more hands-on and interactive for my students.  This sort activity is a fun way to practice those adding and subtracting rules for integers.  I love to have my students do this with a partner because it produces some great math conversations among students.


If you follow me on Instagram you know how much I am loving my Integers Number Line.  I have been using this number line for a few years but this year I am using it in so many different ways.  It is individual pieces which allows you to create a horizontal or vertical number line.  In my experience students see horizontal number lines all the time, but they are not as familiar with vertical number lines.  This year I decided to hang mine up on my whiteboard with magnets so that I can create both a horizontal and vertical number line.


Then I decided I wanted to be able to use it to practice other types of problems so I created a math symbols set.


And then I thought we needed some fractions and decimals to throw in the mix so a new set was born.


I am looking forward to using these three sets all year long with my students.


And last but certainly not least, my newest activity that I am so stinkin' excited about it.


Students can practice all four operations with this digital color by number activity.  As they correctly answer questions parts of the picture began to appear.  Students will have fun guessing what they think the picture might be.

 Mario has me feeling a bit nostalgic


So there you have it!  Five of my favorite Integer Activities.  I have so many activities that I enjoy doing with Integers.  I could easily do a part two to this post if you are interested. 


Monday, August 12, 2019

My 2019-2020 Classroom

Welcome to Room 124!

Allow me to show you around.


I'm going to do my best to link all the resources so if you see something you like just click on the picture. 


I'm joining the #OBSERVEME movement this year.  I'm a bit nervous to have this sign outside of my room, but if I get feedback that helps me grow as an educator it will be well worth it.

I  got the idea and these questions from other teachers on IG.  If you would  like a copy of my template, send me an email.  I'm happy to share it with you.


Our school has a building wide tardy policy that I'm excited about.  If a student is tardy they will scan the QR Code and fill out the form with their name and the class period they are late for.  The information goes straight to the office where they will track tardies and handle the consequences.


Want to confuse people?  Hang this sign outside of a Math classroom.  

So many students and parents were confused at Meet the Teacher Night.

Sorry.

This math teacher loves to read and encourages her students to read.


I struggled with what I wanted to put on my door this year.  When I saw this set by Hannah, I knew it was perfect.  A few students are doubtful but I have until May to change their mind.


A quick glance inside and then I'll show you the details.


I have a small bulletin board on each side of my white board.   I knew I wanted these to match in some way.  I love these math talk stems from Keep Your Chin UP so I decided to split them up and put half on each bulletin board.


The #MathTalk letters are from Hanging with Mrs. Hulsey.


Below my whiteboard I have the 8 Math Standards.  


On my bulletin board is my number line that I put up with magnets.  I am seriously so stinking excited about how versatile it is.  I plan to pull numbers and use them in other ways as well.  We will make problems using those numbers and my math symbols set.


On the left side of the bulletin board are my Levels of Understanding Posters.  I'm excited to have this resource for my students this year.


And on the right side are our Battle of the Classes signs.  I'm got this idea from Josie over at Maniacs in the Middle.  I think it's going to be a fun way to implement some classroom management strategies.  Classes will earn points for various things such as smooth transitions.  At the end of the week the class with the most points gets a little reward.


The space above my white board has been intentionally left blank for now.  I'm not sure what will go there but I know I want to save that space.  Something will come up over the course of the school year that will be perfect for that front and center space.

I'm thinking it might be our social contracts that we will create the second week of school.

Now for that rust colored wall.  

Oh how I hated that wall when I first saw my room.

But the color has grown on me and now it's not so bad.


I struggled to get a good picture of this area.  

The math lyrics are from Brooklyn's Brightest.


And shout out to my sister in law for the cute saying.  

The letters were made using PowerPoint and they are AG Can You Not Bold font.

The headset template I found online and everything else I free handed and then cut out.


Now we come to my little corner of the room.


It's nothing fancy.  Three schedule posters because we run three different schedules.  That's a post for another time.  I'm not sure how I'm going to keep all straight.  Maybe the kids will be able to help me.


I don't remember the last time I had a clock in my classroom.  I chose to take it out years ago and never looked back.  This one was already hanging in my classroom and for some reason I decided to embrace it.  I love that my students will see this reminder every time they check the time.  

I am a believer that if you are going to hang something in your classroom it needs to serve a purpose.  My decor is primarily math related but growth mindset is equally if not more important.

This bulletin board was a labor of love.  It was no easy task hanging this by myself after putting it together in the floor.  But it was worth it!


My Math ABC wall is probably one of my favorite resources I've ever created.  I love hearing my students say, "Wait, isn't that word on our ABC wall?"


It also adds lots of color to the room.


These posters came from Ramona Recommends.  You can get them free by joining her email list.  I made my own because I wanted them to be bigger.

Okay I know I've said I love this and that about my room, but this next part really is my FAVORITE thing about my room.


The idea came from pinterest.  I made the letters using AG Adultish. 

I am so excited for students to give shout outs to their peers.

When my students are dismissed I always say "I Love You. Bye".

So another idea from Josie at Maniacs in the Middle.

I decided to put it above the door.


And there you have it.

My 2019-2020 classroom.

I'm looking forward to all the laughter, mistakes, forgiveness, and growth that are going to take place in this room.  

Until those students walk in tomorrow morning, I will just sit and breathe.


If you have any questions about anything please email me.