Showing posts with label Formative Assessment. Show all posts

Thursday, December 12, 2019

Individualized Learning with Google Forms

I wanted to give my students a formative assessment while providing remediation all at the same time?

Is that even possible?


It is!!

Do you know those Choose Your Own Adventure books?

My brother and I loved those books when we were kids!

Are those even still around?

I haven't seen one in forever.


These books allowed you to determine what happened next in the story based on your decisions of what characters should do at critical points in the story.

You can take this same basic concept to create individualized learning activities for your students using Google Forms.

I made my first one a few weeks ago and I'm here to tell you I will be making more.

I've seen some fancy ones out there and compared to those mine was very simple and not very impressive.

But it worked for my students so I'm calling it a success.

I'll get a little fancier with the next one.


So let me give you a little background as to the purpose of my activity and then I'll tell you how I created it.

My students were reviewing for their assessment on proportional relationships.  Our big ideas for the unit were using tables, graphs, and equations to determine if a relationship between two quantities was proportional or not.


I wanted to be able to do a formative assessment on those three big ideas all while giving students support if they needed it.

Using the branching feature in Google Forms I was able to do just that.

Want to learn how to make your own?

Keep reading and I'll show you.

Branching is how you create multiple paths within one Form.

For my review activity I used branches to allow students to skip from one big idea to another if they answered questions correctly.

If they missed a question they were taken to a video that retaught the big idea and then were given another chance to answer a question about the big idea.

I think they really enjoyed being able to work and learn at their own pace.


So let's get started creating your own.


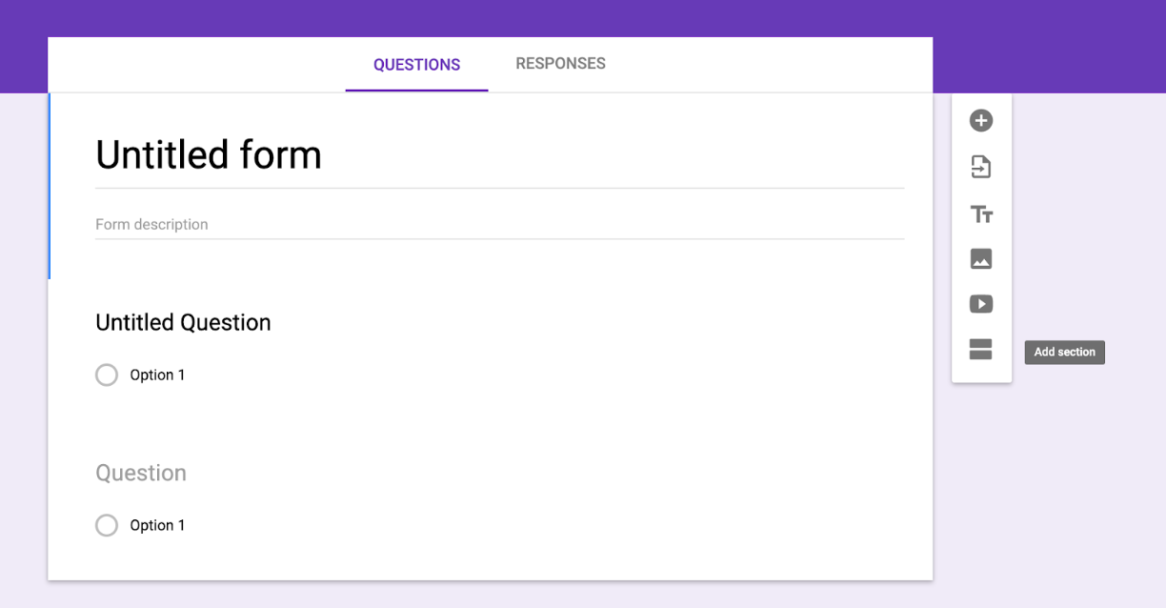
First, create a new Google Form.
Screen Shot 2019-10-14 at 3.08.03 PM

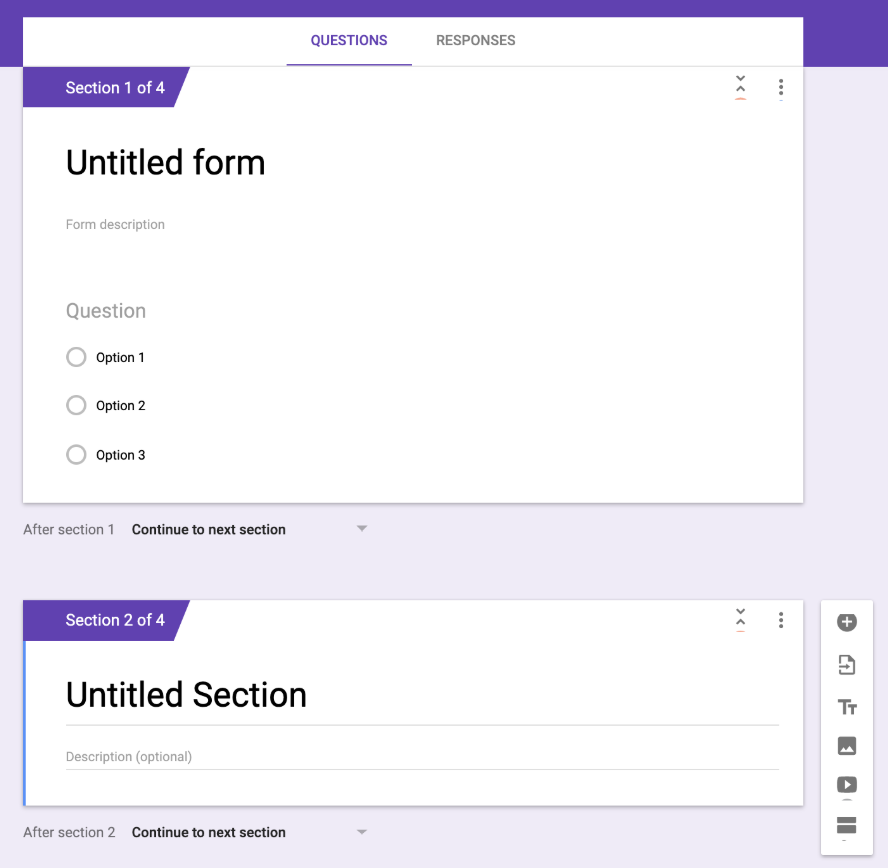
Next select the "Add section" option.  Once you have added a new section you will have two different ways of moving from section to section.
Screen Shot 2019-10-14 at 3.08.14 PM

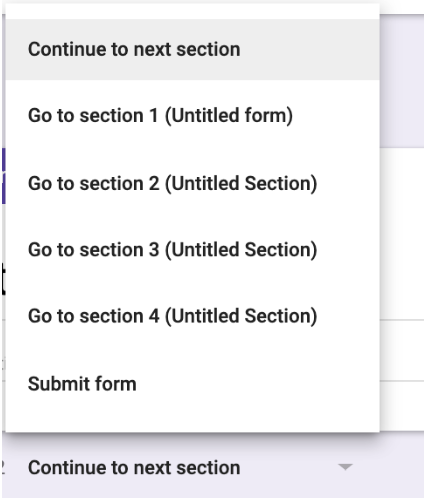
The first option is send your students from one section to another with the branching options as shown below.
Screen Shot 2019-10-14 at 3.08.24 PM

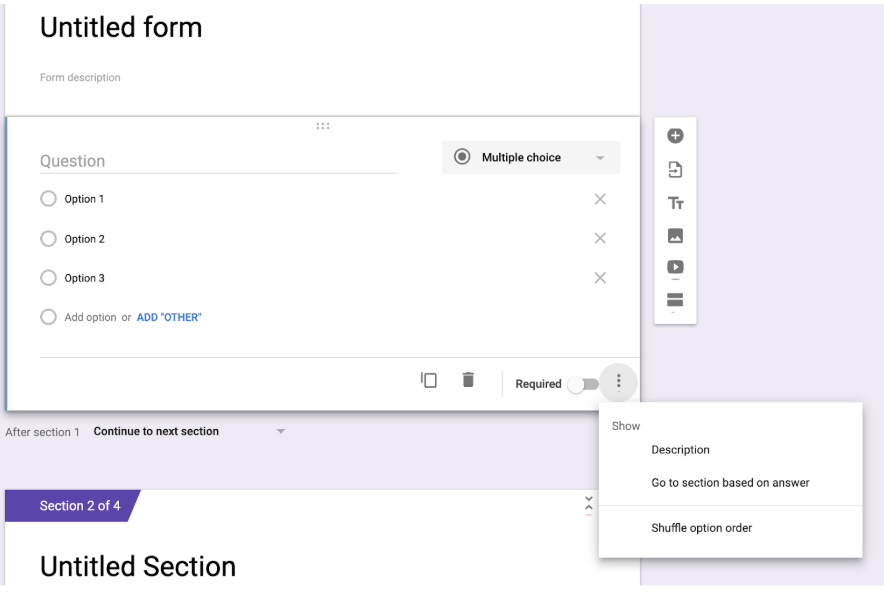
The second option and the one I used is to send students to a section based on their answer.  You can see how to choose this option in the picture below.
Screen Shot 2019-10-14 at 3.08.39 PM

After you  have chosen this option a new menu will appear on each question allowing you to send students to different sections based on their answer.
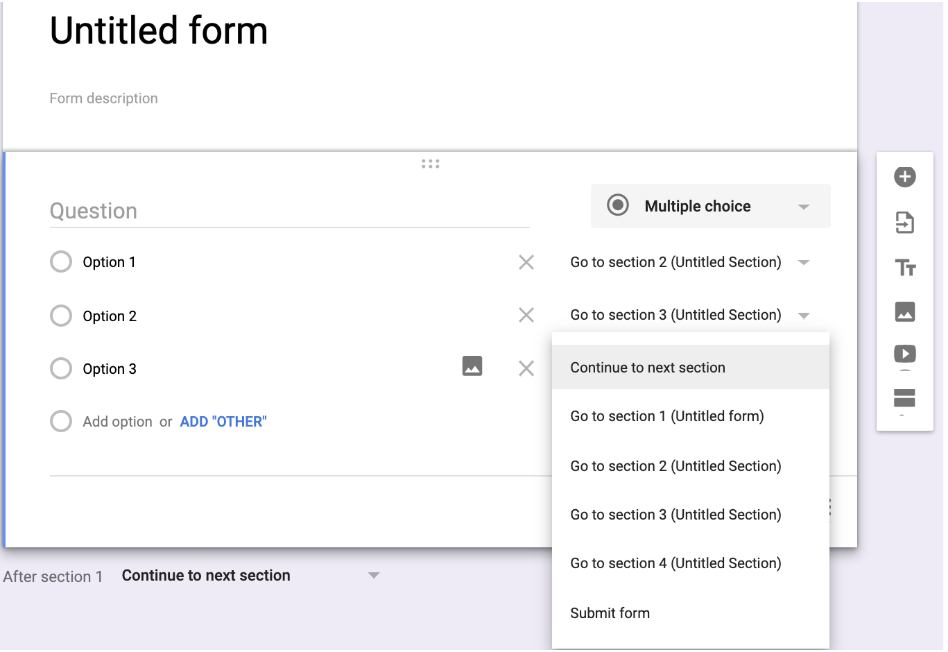
Screen Shot 2019-10-14 at 3.08.51 PM

It's that easy.

Of course depending on how many sections you create it can become a little more intricate.

I found that for me it was helpful to write out my plan on paper before trying to create the  Form and all the different sections and branches.

For example...

Section 1: Is the table proportional?
Section 2: Video Help #1
Section 3: Attempt #2
Section 4: Video Help #2
Section 5: Attempt #3

Section 6: Is the graph proportional?


On this form I gave students three attempts for each big idea.  They were three different questions, but were all the same time of question.

I set the third attempt to have response validation.  This requires students input the correct answer before being allowed to move on.

If students got to that third attempt and couldn't figure out the right answer I was able to reteach them one on one or in a small group.

I hope this makes sense.

If you have any questions please send me an email or leave a comment with your question.


Let's chat again soon!

Tuesday, July 30, 2019

Create A Quiz Using Google Forms

Imagine your students just completed an Exit Ticket.  

Or maybe it was a quiz they just finished.

You need to grade it quickly so your students can have that invaluable feedback.

But you have plans tonight and there is no time for grading over 100 papers.


It's easy to imagine because as teachers we've all been there.

We want our students to have that immediate feedback but that stack of papers that needs grading has never been more daunting.

Friends, I bring good news.


Did you know you can create a quiz (or any type of assessment) using Google Forms?

Y'all!

It will grade the assessment for you and your students get IMMEDIATE feedback.

You don't even need any google extensions or other tools to make it happen.

It's magic.  

Let me show you how to make it happen so you can be as happy as this guy while telling all your teacher friends how you stopped grading that stack of papers.


First open up your Google Form as you normally would and give it a title.

I recommend making the first question a place for students to put their names.


Be sure to mark that REQUIRED button.  You're going to want to do that for all questions.  This ensures that students will answer every single question.

To add another question, click the plus sign on the right.

You might want to add a multiple choice question for class period if you teach multiple sections of the same class.  That is totally your call but it does allow you to sort the responses by class period.

Then add your first assessment question.


Okay...let's  make this thing a quiz and reduce our grading.

Click on your settings in the top right corner.  It's the little gear

You will have a box pop up with three options.

General, Presentations, and Quizzes.

Choose Quizzes.

Click the slider button that says Make This a Quiz.


As you can see you have a few customization options.  

It is automatically set to give students their grade and results immediately after they submit it.  It is also set to show students the questions they missed, the correct answers, and the point value of each question.

Most of the time I use these options and do not change anything.

When you have those options set the way you want them click save.

This makes every question you currently have as well as those you are planning to add part of the quiz.

You should now see a new feature on each question that says Answer Key.


Click on that and you will see where you can put the correct answer in place as well as choose the point value for that question.


Notice that you can add more than one answer.  This is great if you think students might misspell a word and you aren't grading for spelling.  You might also want to take into consideration all the possible ways a student might type an answer.

For example with this integer quiz they might put a space between the negative sign and the number if their answer is -4.  

Because of that I will add a few answers.  -4 and - 4.  


You are now ready to repeat this process with your other questions.

It's that easy.

If you have any questions please don't hesitate to email me or leave them in a comment.

I'd love to help you create your first quiz using Google Forms.


Let's chat again soon!

-Elaina

Wednesday, July 3, 2019

Five Ways to Use QR Codes in the Classroom


I used to think elementary when I heard someone talking about math stations.  Four or five years ago a mentor of mine taught me that math stations are not only doable in middle school, but middle school students still love them.  

And y'all I haven't looked back since.

I love me some stations.

What does this have to do with  QR Codes?

When I first began implementing stations I was on the hunt for activities that students could work on without me holding their hand.  QR Codes was one of those activities.


By adding QR Codes to my task cards students are able to check their answers on their own.

No more, "Mrs. Weaver, is this the right answer for #2?"

QR Codes have freed me up to work with small groups.


I have found that this type of activity also encourages students to take ownership of their learning.  Could they just scan the code and have the answer?  Absolutely.  But what do they learn from that?  This is the type of conversation we have often when we first start doing task cards with QR Codes.  Students are encouraged to do the work before scanning and then if they make a mistake and come up with an incorrect answer they are encouraged to figure out their mistake on their own.

I love seeing the growth in my students over the year using these task cards.


Quiz and Test can be scary words for students.  If I can assess my students without using those two words or without making it feel like an assessment?  Well I'm here for that.

Plickers is a great formative assessment tool.  When I first started using Plickers a few years ago it was free.  Sadly you now have to pay for the full version.

But don't let that deter you.

You can ask up to five questions at a time using the free version.  This still works perfectly as a warm up or an exit ticket type activity.  


If you have never used plickers, here's a quick run down of how it works.

Students each have an unique qr code that they use to answer multiple choice questions.  You use your device to scan the qr codes to record answers.  It's immediate feedback for everyone.  You can read more about them in this post I wrote a few years ago.

Classroom Documentation...there's a fun topic.

You can use QR Codes to help you with documentation.  I love this idea from Preppy Zesty Teacherista.


Have students scan a QR code to document no homework, or leaving the classroom for the bathroom or nurse, or being tardy.  The options are endless.

Want to get students excited about a free pencil or a fun little eraser?  And I'm talking Middle School students.

Amp up the anticipation of rewards with QR Codes.  


Students love the anticipation of not knowing what little reward they will receive.  I find it fun to watch them act like they know or remember each QR code.  Most of these rewards cost me nothing and students seriously love it.  It's a game of chance.

Last but not least, use QR Codes to help your students study and prepare for an upcoming assessment.  When you make that study guide, add a QR code to it that links students to a helpful youtube video.  

You could even have your students find the videos for you.  

When they get home and need a little extra help on that one problem, they can scan the QR code and watch a video that explains how to solve the problem.


Do you use QR Codes in your classroom?

How do you use them?


HOW TO CREATE A QR CODE