Showing posts with label technology. Show all posts

Thursday, December 12, 2019

Individualized Learning with Google Forms

I wanted to give my students a formative assessment while providing remediation all at the same time?

Is that even possible?


It is!!

Do you know those Choose Your Own Adventure books?

My brother and I loved those books when we were kids!

Are those even still around?

I haven't seen one in forever.


These books allowed you to determine what happened next in the story based on your decisions of what characters should do at critical points in the story.

You can take this same basic concept to create individualized learning activities for your students using Google Forms.

I made my first one a few weeks ago and I'm here to tell you I will be making more.

I've seen some fancy ones out there and compared to those mine was very simple and not very impressive.

But it worked for my students so I'm calling it a success.

I'll get a little fancier with the next one.


So let me give you a little background as to the purpose of my activity and then I'll tell you how I created it.

My students were reviewing for their assessment on proportional relationships.  Our big ideas for the unit were using tables, graphs, and equations to determine if a relationship between two quantities was proportional or not.


I wanted to be able to do a formative assessment on those three big ideas all while giving students support if they needed it.

Using the branching feature in Google Forms I was able to do just that.

Want to learn how to make your own?

Keep reading and I'll show you.

Branching is how you create multiple paths within one Form.

For my review activity I used branches to allow students to skip from one big idea to another if they answered questions correctly.

If they missed a question they were taken to a video that retaught the big idea and then were given another chance to answer a question about the big idea.

I think they really enjoyed being able to work and learn at their own pace.


So let's get started creating your own.


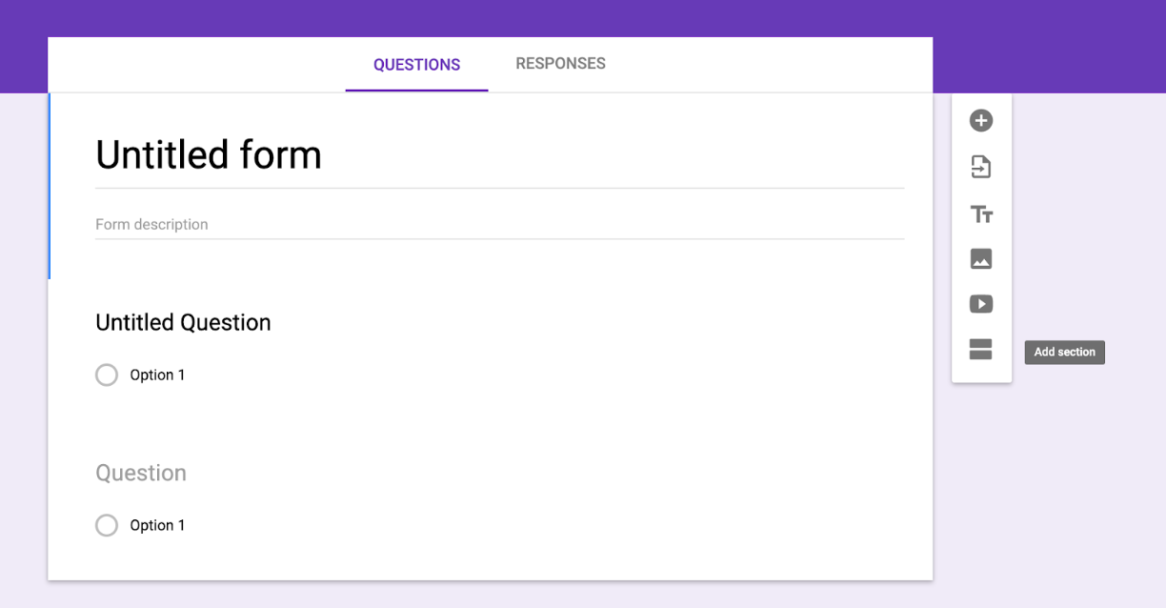
First, create a new Google Form.
Screen Shot 2019-10-14 at 3.08.03 PM

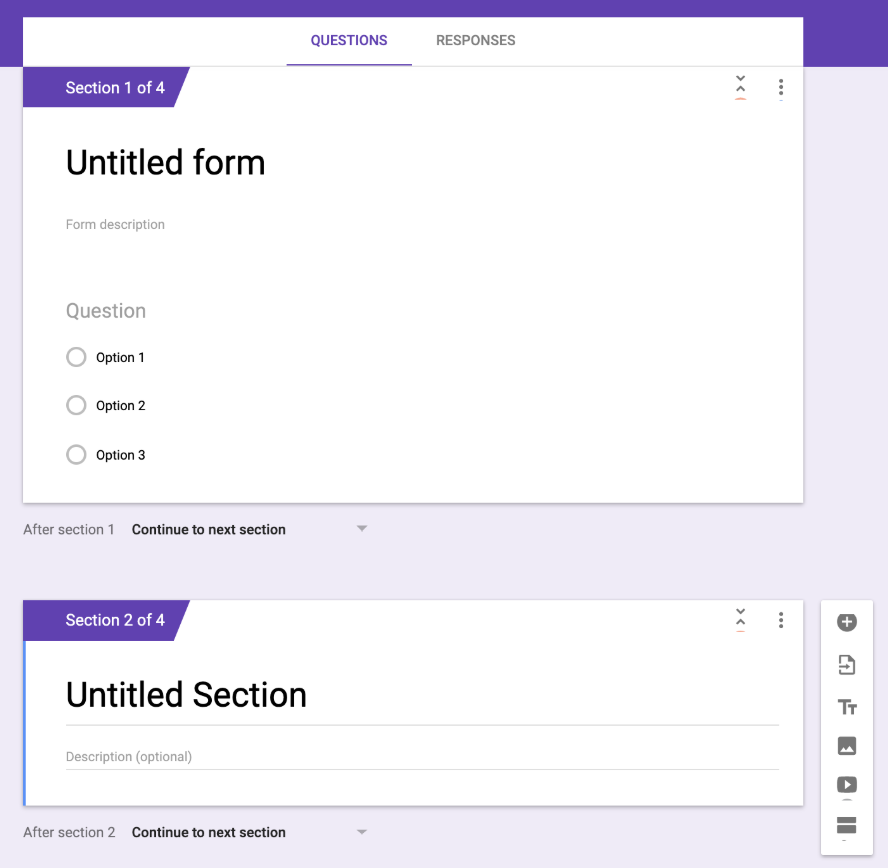
Next select the "Add section" option.  Once you have added a new section you will have two different ways of moving from section to section.
Screen Shot 2019-10-14 at 3.08.14 PM

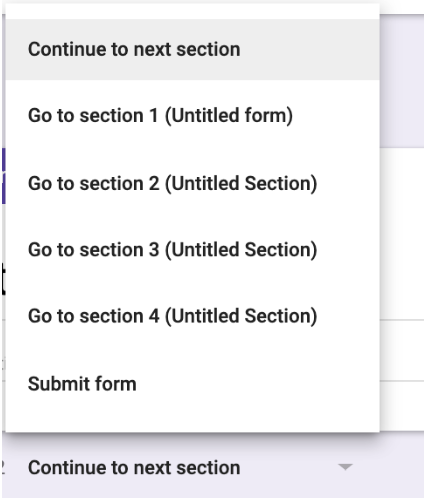
The first option is send your students from one section to another with the branching options as shown below.
Screen Shot 2019-10-14 at 3.08.24 PM

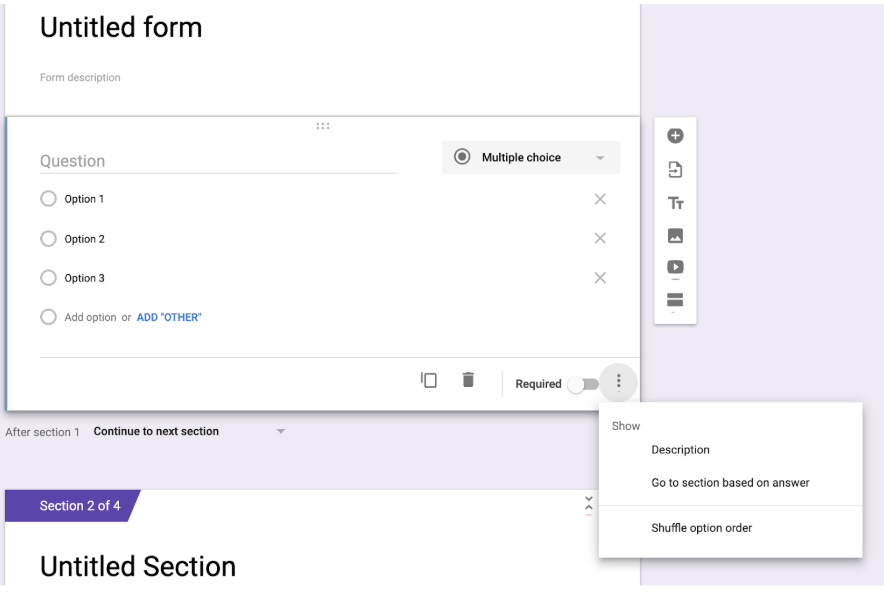
The second option and the one I used is to send students to a section based on their answer.  You can see how to choose this option in the picture below.
Screen Shot 2019-10-14 at 3.08.39 PM

After you  have chosen this option a new menu will appear on each question allowing you to send students to different sections based on their answer.
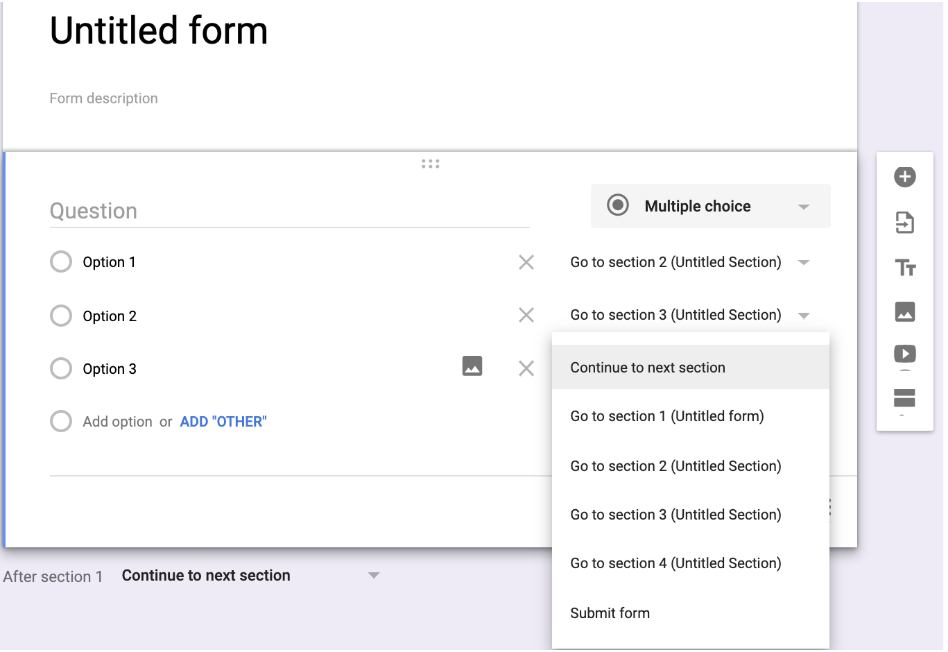
Screen Shot 2019-10-14 at 3.08.51 PM

It's that easy.

Of course depending on how many sections you create it can become a little more intricate.

I found that for me it was helpful to write out my plan on paper before trying to create the  Form and all the different sections and branches.

For example...

Section 1: Is the table proportional?
Section 2: Video Help #1
Section 3: Attempt #2
Section 4: Video Help #2
Section 5: Attempt #3

Section 6: Is the graph proportional?


On this form I gave students three attempts for each big idea.  They were three different questions, but were all the same time of question.

I set the third attempt to have response validation.  This requires students input the correct answer before being allowed to move on.

If students got to that third attempt and couldn't figure out the right answer I was able to reteach them one on one or in a small group.

I hope this makes sense.

If you have any questions please send me an email or leave a comment with your question.


Let's chat again soon!

Tuesday, July 30, 2019

Create A Quiz Using Google Forms

Imagine your students just completed an Exit Ticket.  

Or maybe it was a quiz they just finished.

You need to grade it quickly so your students can have that invaluable feedback.

But you have plans tonight and there is no time for grading over 100 papers.


It's easy to imagine because as teachers we've all been there.

We want our students to have that immediate feedback but that stack of papers that needs grading has never been more daunting.

Friends, I bring good news.


Did you know you can create a quiz (or any type of assessment) using Google Forms?

Y'all!

It will grade the assessment for you and your students get IMMEDIATE feedback.

You don't even need any google extensions or other tools to make it happen.

It's magic.  

Let me show you how to make it happen so you can be as happy as this guy while telling all your teacher friends how you stopped grading that stack of papers.


First open up your Google Form as you normally would and give it a title.

I recommend making the first question a place for students to put their names.


Be sure to mark that REQUIRED button.  You're going to want to do that for all questions.  This ensures that students will answer every single question.

To add another question, click the plus sign on the right.

You might want to add a multiple choice question for class period if you teach multiple sections of the same class.  That is totally your call but it does allow you to sort the responses by class period.

Then add your first assessment question.


Okay...let's  make this thing a quiz and reduce our grading.

Click on your settings in the top right corner.  It's the little gear

You will have a box pop up with three options.

General, Presentations, and Quizzes.

Choose Quizzes.

Click the slider button that says Make This a Quiz.


As you can see you have a few customization options.  

It is automatically set to give students their grade and results immediately after they submit it.  It is also set to show students the questions they missed, the correct answers, and the point value of each question.

Most of the time I use these options and do not change anything.

When you have those options set the way you want them click save.

This makes every question you currently have as well as those you are planning to add part of the quiz.

You should now see a new feature on each question that says Answer Key.


Click on that and you will see where you can put the correct answer in place as well as choose the point value for that question.


Notice that you can add more than one answer.  This is great if you think students might misspell a word and you aren't grading for spelling.  You might also want to take into consideration all the possible ways a student might type an answer.

For example with this integer quiz they might put a space between the negative sign and the number if their answer is -4.  

Because of that I will add a few answers.  -4 and - 4.  


You are now ready to repeat this process with your other questions.

It's that easy.

If you have any questions please don't hesitate to email me or leave them in a comment.

I'd love to help you create your first quiz using Google Forms.


Let's chat again soon!

-Elaina

Tuesday, July 16, 2019

Creating Task Cards Using QR Codes

Hey y'all!

Who is ready for this week's #TechTipsTuesday?


This week's tip is one requested by you guys.

I am excited to show you how to create your own task cards using QR Codes. These task cards have the ability to shift the responsibility of learning from your shoulders to your students.  Using QR Codes allows students to check their own work and encourages them to find and learn from their mistakes.

Let's get started.

First, you will need to decide what concept/topic you want to use for your task cards and start creating those task cards using PowerPoint.


If you don't know how to create task cards in PowerPoint, let me know.  I'll do a #TechTipsTuesday about that soon.

Now it's time for the fun part.  Creating and inserting those QR Codes.

I'm going to create a code for Card 1.  The purpose of the QR Code on task cards is to reveal the answer to students so they can check their work without needing you.  This frees you up to work with small groups or even individual students.

You may be thinking to yourself...

Can't they just scan the code and have the answer without doing any work?

Yes.  

They can.

This is why it is crucial to discuss the importance of doing the work and learning from their mistakes.  Build a sense of ownership within your students.

Because the purpose is to reveal the answer the first step in creating the code for Card 1 is to know the answer for that card.

In this case the answer is 34.54 feet.

Now that we have the answer we are going to open up a web browser and search for qr code generator.


I like to use that first option that appears in the search.  There might be one out there that is infinitely better, but that first one is free and easy to use so I'll take it.


After you've clicked on that first option you will see that there are several different ways you can use QR Codes.  They can send your students to a website, to a image, or play a song.  

The uses are endless.

For our task cards we want the QR Code to lead to text.  

Choose text and then type the answer into the blank box.


Once you have entered your text (the answer) click the green bar that says "CREATE QR CODE".

The QR Code on the right will darken up and appear black.


Below the QR Code you can customize it if you prefer a different look.  You can add a frame that says "Scan Me" or change the color if you are printing using a colored printer.  

I prefer to leave it as it is for my task cards.  

After you customize it to your liking click the green bar below it that says "DOWNLOAD JPG".

A pop up box will immediately appear saying it will download soon.  You can exit out of that at any time.


You are finished creating your QR Code.  Now it's time to insert it into your task card.

Remember we downloaded it as a JPEG.

Go back to your task cards and INSERT PICTURE


Your QR Code will be in your downloads folder.


Just choose your code and then select open.

It will be inserted into your PowerPoint and will be bigger than you need.


Your last step is to make it smaller and then drag it to the correct card.


That's all there is too it.

Now if you are still a little unsure of some steps or want a few more tips, you might want to check out this video I created showing you step by step.  I don't know about you, but sometimes I need to see it being done.


Want to try out some task cards before creating your own?

Check out these that I've already created for you.


Check out this blog post to see other ways you can use QR Codes in your classroom.


If you have any questions about QR Codes leave me a comment and I'll get back to you soon.

Tuesday, June 13, 2017

What I've Been Pinning

Like everyone else I LOVE Pinterest.

I often wonder what we teachers ever did before Pinterest and other forms of social media.

Connecting with other teachers and sharing ideas with one another is amazing.

Of course it can also be overwhelming at times.  There are sooo many great ideas out there.

Today I thought I'd share a few things I've pinned recently.

If you see something you like, just click on the picture to go to the original site.


ONE.

These tokens are designed to help with those students who always seem to be blurting out in class. You know the ones I'm talking about it.

However when I saw them I immediately thought of another use for them.  I encourage a lot of small group discussion in my classroom.  Just like wevhave those students who love to talk and share their knowledge we also have those students who cringe at the thought of talking aloud.  I want to use these tokens during small group discussions as way to make sure every student participates and no students hog the conversation.  


TWO.

I love everything about this photo.  I love the three "rules" at the top.  I love the colors and the fonts.  I plan to do something similar to this in my classroom next year.  Shoutout to @teachcreatemotivate for such cuteness in her classroom.


THREE.

Next year for the first time ever I will have a chrome cart in my classroom.  A whole cart just for my students every single day.  

Cue happy dance!

I plan to step up my Google game next year and I'm loving the idea of having students record their answers to task cards or any station activity on a google form.  


FOUR.

This is one of my favorite sayings for a classroom.  This is and "throw kindness around like confetti".
Again I love the bright colors.  This may very well be my bulletin board next year.


FIVE.

For the past two years I have been allowed to wear jeans whenever I wanted.  Let me tell you it has been glorious.  Next year I will be in a new district and will have to say goodbye to jeans.  It's sad but I'm excited by the excuse to spruce up my wardrobe a little.  I've been pinning lots of outfit ideas.


What's the best pin you've found recently?  Leave me a comment letting me know.  I'd love to hear from you.

Monday, April 24, 2017

My New Obsession...Podcasts

I love connecting with other teachers through social media.  I've learned so much from you guys.

One of my new obsessions...Podcasts!

I usually prefer music while I'm driving but lately I've been listening to Podcasts to and from work.  I've gotten some pretty awesome ideas from them.

Right now the "teacher" Podcasts I listen to are...


Do you have any Podcasts recommendations?

Thursday, July 7, 2016

Plickers - An Online Assessment

I would consider myself to be a fairly tech savvy person.

Yet when it comes to my classroom, I don't incorporate as much technology as I would like.

I plan to change that next year and have been to a few technology workshop this summer looking for new ideas.

I have gotten so many great ideas that I spent the month of June with my brain on major overload.

One of the ideas that I'm excited to use is Plickers.

Have you heard of it?


So What Is It?

Back when I was in college I had to purchase a very expensive clicker for my biology class.  Every day we had a quiz at the beginning of class.  I would use my clicker to select my answer.  My individual clicker number would appear on the screen when I had answered.

Plickers is a lot like that.  

Only it's free.

How Does It Work?

Students use a Plicker (paper clicker) to answer the question.

You can see a picture of a Plicker up above.  It reminds me of a QR Code, which I love using in my classroom.

As the teacher you will need to install the free app on your phone or ipad so that you can scan the Plickers.

I was a little skeptical about this at first.  How much valuable time would I waste trying to scan all the plickers in my classroom.

Y'all it only took a couple of seconds to scan them all.

Getting Started

To get started you will need to download the app as I mentioned before as well as set up an account on their webbsite www.plickers.com

Print the Plickers for your students to use.

Because I have three different Math classes I created three different classes on the website.  However, I can use the same set of cards for all three groups.  Students from different classes can share the same card.

Once you have created your account and set up your classes you are ready to start creating questions.

Here are a few I have created about ratios.


Putting It To Use

Once you have everything set up, you are ready to use it with your students.  Spruce up your exit tickets or have fun reviewing for an upcoming test.  There are so many ways to use Plickers.

You choose a question to display for students.

They hold their card with their answer on top.

Use your app to scan the room.

Immediate feedback.

Glorious!!

I love that every card is different.  Students can't  decide how to turn their card based on their classmates' cards.

Keeping Up With the Cards

I do not plan to have my students keep up with their Plickers for a couple of reasons.

One..I want to use the same set for all three classes.

Two...They would lose them the first week.

Seriously!!

I have found several good ideas on Pinterest (What did we do before Pinterest?) for ways to store Plickers.

One teacher had students glue them in your notebook.  This would be great if you were only using one set.  She told students it didn't matter where the A was when they glued them in.  This ensured that their notebooks were all turned differently when they answered...again preventing them from copying from a friend.

Several teachers punch a hole in the corner of the card to hang them on a wall or bulletin board.


I love this idea of printing them a little smaller and using a pocket chart.


So yeah...

I'm absolutely giddy about using Plickers in my classroom next year.  

I think my students are really going to enjoy it.

If you are new to Plickers you can check out Pinterest for a ton of great ideas.

And if you have used Plickers in the past, I would love to hear from you.  Did your students love it?  How often did you do it?  How did you use it?

Sunday, August 18, 2013

The One With Social Media

Are your students a part of the social media community?

Having taught 7th grade for the past seven years, I've had very few students who were not a part of social media.  They all seem to have instagram, facebook, twitter, or some other form of social media.

What about you?  Do you participate in the social media community?  I do.

Every year one of the first things I tell my students is that yes I have an instagram account and yes I have a facebook account.  But no I will not be "friends" with you or allow you to follow me.

My students have always understood this.  They still try to friend me or request to follow me. But they understand that for me it is part of being a professional.

My accounts are set to private.  If  students try to look up my pages the only things they will be able to see are my name and my profile picture.

There is nothing on any of my accounts that I wouldn't share with my students.  I'm not posting inappropriate pictures or badmouthing my school.

However, for me I feel like I need a line between being me and being Mrs. Weaver.  I need some separation.

I've also watched multiple teachers be fired for inappropriate conduct with students.  Though I know I would never do anything like that, I don't want to risk anything being misinterpreted.

Though I have worked with other teachers who are friends with their students on facebook, I've never been in the minority.  Those teachers who allow it have been few and far between.

However, at my new school I believe I will be in the minority.  It is a very small and close knit community.  I have already received and declined requests from students and their parents and I haven't even met them yet.

My coworkers accept these requests.  That's fine for them.  I do not judge them.  But it is something I'm not comfortable with.

I've thought about creating an instagram or facebook as Mrs. Weaver just for my students but I don't think I would ever keep up with it.

What is your take on social media?  Are you friends with your students?  Why or why not?  Is this even allowed by your administration?

I'm not looking to start a debate.  I believe we all need to decide for ourselves.  I'm simply curious as to what your take is on the issue.

Sunday, June 30, 2013

The One With QR Codes Part Two

Have you downloaded your QR Scanner App?

Did you try scanning the QR Code in my last post?

GREAT!  Let's look at how they can be used in the classroom?

1.  My first creation for using QR codes is part of my reward system.  I have created 12 QR Codes that coincide with 12 different rewards.  These rewards are things that for the most part do not cost me any money.  They are things such as eating lunch with the teacher, not wearing shoes in class, and having the night off from homework.  

I plan to print the QR codes and laminate them.  I may print more of some codes so that students have a greater chance of drawing a homework pass than they do of receiving lunch with the teacher.

After they have been laminated, students will be able to draw a QR code, scan it, and see what they have won.

I love the mystery and excitement.

For example, when students scan a code, they might be given this picture.


All done with my chevron and owl theme.
You can purchase these 12 QR Codes in my TPT store.  

2.  Create a QR Code that links to Plain Text.  You can include your email address, website, school phone number, or whatever contact information you would like parents to have.  They can scan the QR code at Open House.

3. Use QR Codes as a way for students to self check their work.  Students work out the problem and then scan a QR Code for the answer.

4. Do you have a blog or class website where you post homework?  Create a QR Code that will take students directly to that site.  Tape the code in their binder/notebook.  It will always be there if they forget the assignment or get stuck on a problem.

5. Create a QR Code that coincides with a YouTube video.  It's a great way for students to review a concept or learn a catchy song about the concept.

6. Create a scavenger hunt with QR codes around the classroom.  This would be a great way to introduce yourself at the beginning of the year.

7. Instead of a typical worksheet with questions, use QR codes.  Students match or write in the answer with the correct QR Code.

8. I LOVE the idea this blogger had.  She has students ordering fractions that are on bottle caps.  Once they have them ordered, they scan the QR Codes that are on the inside of the cap.  The code tells them where in line that cap should be located.

9. Attach a QR Code to field trip details.  Students simply scan the code and have all the information they need.

10. Link a QR Code with a song that will enhance a concept for students.

Saturday, June 29, 2013

The One With QR Codes Part One

I have been fascinated with QR Codes for the past several months.  They have been popping up on Pinterest occasionally and have peaked my interest.

I love bringing technology into the classroom.  Students really enjoy it.  I really enjoy it.

If you are like I was in the beginning, you may not be sure about QR codes.

What are they?

How can they be used in the classroom?

Those were the two questions I had.

I'm sure you have seen QR codes.  They seem to be everywhere these days.

Here is an example.


Have you seen these around?

The basic idea is that you scan this code with your phone and information that has been assigned to the code is revealed.

In order to scan it you will need a smart phone, ipad, or something with a camera.

There are several apps out there to read QR Codes.

This is the one I use.


Once that is downloaded, you can scan QR codes.  If you scan the one above, it will take you directly to my TPT store.  Go ahead.  Try it!

Now what about creating the QR code?  There are several websites you can use.  

The one I have been using is http://wwwqrstuff.com

It is super easy!  You can create QR Codes for websites, Plain Text, YouTube Videos, and so much more.

The options for using them in the classroom seems to be endless.  I will share some of the uses in Part Two.


Tuesday, November 6, 2012

The One With No Voice

I was sick with stomach flu Thursday and Friday.  I had a sore throat all weekend and the result was a loss of my voice.  I mean 100% loss of voice.

I woke up this morning not being about to talk at all.
The best I could manage was a very quiet whisper.

I don't know that I have ever been so thankful for technology.

As a means of communicating with my students today, I opened up Microsoft Word on my computer and turned the projector on.  

My students absolutely loved this.  

One of my favorite moments from the day was when a kid told the rest of the class to be quiet and listen.  Haha!  She quickly said "I mean read"

Their favorite moments from the day would probably be when I would type their names to call on them.  They thought this was too funny.

Honestly, they were probably on their best behavior today.  They were so sweet.  A few of them would whisper back to me.  Cracked me up!!

I'm curious.  Have you ever lost your voice?  How did you conduct class?  Or did you stay home?

I'm praying my voice returns tomorrow.  Though I may not let my students know if it does just to keep that good behavior. :)

Monday, June 11, 2012

The One With Weebly

A few years ago some of my good friends at proteacher inspired me to create a website for my students and their parents. I spent hours that summer scouring the Internet, choosing the right site, and creating my web page. My students loved it!  It was a dream come true.  Unfortunately like most things the enthusiasm died down 2nd semester and by the end of the year we were no longer using the site.

Then I was switched from history to math - man I switch a lot!  I never changed my website.  Let's just say that particular group of students did not create a desire in my to go above and beyond the call of duty.  This past year when I wanted to get up and running again it had for some reason become a blocked site at school.  That is when I chose to use Edmodo.

I became pumped about Edmodo.  It was going to be the perfect alternative.  Turns out, it wasn't.  My students LOVED it, but there were just things about it that drove me crazy.  They viewed it more as getting to use facebook at school than as an educational tool.  I just never got passed that with them.  We had stopped using it by Christmas break.

Our technology person as since unblocked my original website and I'm spending yet another summer working on it getting it ready for my students.  And I can't wait!!  I'm already writing wonderful blog post in my head for them to respond to.  I really believe it is going to be a great tool for teaching ELA.  Determined to not let the fizzle die, I'm trying to come up with things to add as the year goes on so that there is constantly something new and exciting for students to explore.

Though it is still very much so a work in progress, I wanted to share the site with you.  If you don't have a class webpage and are looking for something easy to use, I strongly suggest weebly.  It has been extremely simple for me to create and for my students to navigate.

If you have a moment, check out www.weaversclass.weebly.com and let me know what you think.  If you have a class web page already, I love to peruse your site as well.  Let's share our ideas.  After all, isn't that what we teachers do best?

Sunday, November 27, 2011

The One With Edmodo

Have you ever heard of dmodo? It's basically facebook for the classroom. My students love it. I love that I have complete control over everything that goes on.

You create an account as a teacher and then set up different groups. I have one group for my Math classes and one group for my Science classes. Some teachers create their groups based on class periods. Students must have your group code to create an account and join your group. This lets you approve everyone who joins your group. Once they've joined, they no longer need the code, which you can change at any time.

A few of my favorite Edmodo features:

Calendar: I can post our day to day activity on the calendar. Both students and parents have access this. It really cuts down on all of those questions about what is going on. They just check the calendar.

Library: I can load files to the library which allows students to access them at any time. There is no more "I lost that". They just print it off from the library.

Assignments: Students can complete and turn in assignments online. They love this.


This year we have primarily used Edmodo to incorporate literacy into the math classroom. I've given my students a new online game to play for the past three weeks. They written paragraphs giving their opinion on the game, made Venn diagrams comparing two games, and much more.

Though I really like edmodo, I feel like I haven't been using it to its full potential. Do any of you use edmodo? How do you use it? I'd appreciate any and all ideas.

Sunday, July 31, 2011

The One With the iPad2

For the past three years I have been participating in a grant workshop. Our co-op received a grant to study data in middle school science classes. This will be my third and final year. Through this grant program, I have received some really nice things for my classroom.

However, this year has topped the other two years combined. We learned last week that we will all be receiving an iPad2. To say that I'm a bit excited would be a huge understatement.


Now I have the technology I just need to learn some great ways to use it in the classroom. I've been told about the splashtop app which apparently allows me to use my computer via my iPad. I'm loving this. I do not like to be confined to my computer to show things on the projector or with my mimio.

What educational app can you not live without? Any suggestions? Do you have one? How do you use it?